


How to Add HTML Files to WordPress: Step by Step Guide
Back when the Internet was just emerging, all websites were built only of text and some basic static HTML.
Now, after 20 years, we have seen that the web is a different place. The websites nowadays are nothing but complex applications.
In addition, they are unique and offer a seamless experience for website visitors and developers. This, basically is because of the paradigm shift to open source Content Management System (CMS) like WordPress.
WordPress is a huge and leading name in the web industry empowering 39.1% of the web. Assuredly, it has several in-built features with which you can build pages and content without HTML. It is because of the reason that WordPress core has in-built content types.
Besides, the WordPress theme you use has its own pre-designed templates that could be used to create an outstanding website according to the website requirements. In addition, many WordPress landing page plugins can be used to make the customized page templates for the website visitors to land from email campaigns, search results, and social media as well.
Hence, considering all the viewpoints in mind, we are presenting to you the step by step guide on how to upload HTML files to WordPress.
 Step 2: Choose the HTML file from your PC and upload it the similar way you upload any image or video. You might face an error like the image shown below while doing this:
 Also, if you are not able to upload the file from the media library, then, you can also try the below options:
 Also, you can copy and paste the HTML code to the page or post. On the right-hand side, select the three dots to have More options and Tools. Choose Code Editor.
It changes the overall page to HTML. What you can do is that- you can copy the HTML code from the HTML file and then, paste it here.
Also, you can copy and paste the HTML code to the page or post. On the right-hand side, select the three dots to have More options and Tools. Choose Code Editor.
It changes the overall page to HTML. What you can do is that- you can copy the HTML code from the HTML file and then, paste it here.
 Also, you can choose between Text and Visual Editors on the right-hand side. The text editor that is HTML editor changes the page to HTML and enables you to paste the HTML code. If the uploaded file is not working then, you can also copy and paste it here.
 Step 2: Choose File Manager and then, select the folder, public_html. This folder has three more folders, known as, wp-includes, wp-content, wp-admin.
Step 3 Build a folder by choosing the "+Folder" option from the top bar menu and then, name it anything of your choice.
Step 2: Choose File Manager and then, select the folder, public_html. This folder has three more folders, known as, wp-includes, wp-content, wp-admin.
Step 3 Build a folder by choosing the "+Folder" option from the top bar menu and then, name it anything of your choice.
 Step 4: Zip files can also get uploaded here.
Note: Before zipping the file, you have to rename the index.html to index.php (you can also choose a different name as well). It is because of the reason that the WordPress website also holds the index.html file. If you upload the new one, then, it will overwrite the existing file and results in some errors on the website.
After renaming the index file and zipping the folder, you can upload it to the folder you built.
Step 4: Zip files can also get uploaded here.
Note: Before zipping the file, you have to rename the index.html to index.php (you can also choose a different name as well). It is because of the reason that the WordPress website also holds the index.html file. If you upload the new one, then, it will overwrite the existing file and results in some errors on the website.
After renaming the index file and zipping the folder, you can upload it to the folder you built.
 Step 5: Now, you can right-click on the folder and select the contents. If you want, then, you can also delete the zip file as well.
This is how you can upload the HTML file to the website successfully.
Step 5: Now, you can right-click on the folder and select the contents. If you want, then, you can also delete the zip file as well.
This is how you can upload the HTML file to the website successfully.
 Note: In any case, you do not have the FTP details, then, you can contact the web host.
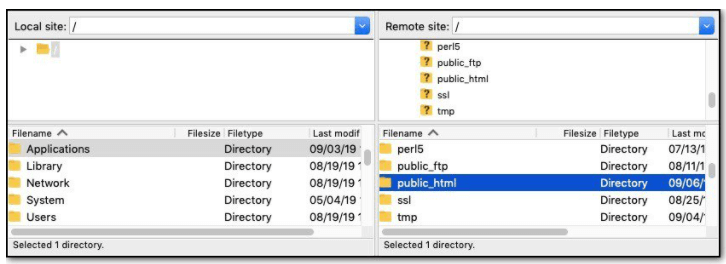
Step 3: FileZilla will build a connection with the webserver. You can find out the left-hand panel termed as Local site that is your Computer and the right-hand panel termed as Remote site that is your website.
Step 4: From the right-hand panel, choose the folder, termed as public_html. It is the place where the website's folders and files stay. If your folder is named with something else, then, you can choose that folder.
Note: In any case, you do not have the FTP details, then, you can contact the web host.
Step 3: FileZilla will build a connection with the webserver. You can find out the left-hand panel termed as Local site that is your Computer and the right-hand panel termed as Remote site that is your website.
Step 4: From the right-hand panel, choose the folder, termed as public_html. It is the place where the website's folders and files stay. If your folder is named with something else, then, you can choose that folder.
 Step 5: Make a folder here for the HTML file by choosing and right-clicking on the Create directory and enter it.
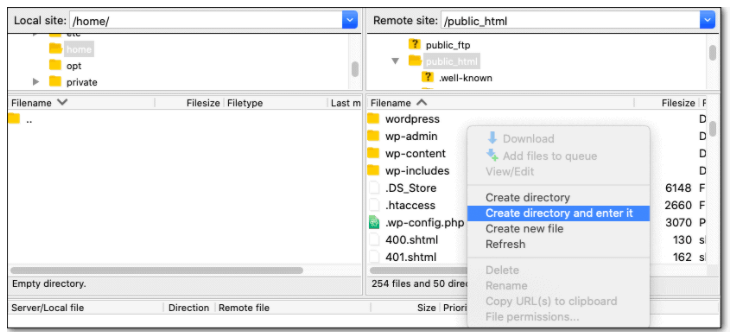 Step 6: From the left-hand panel, choose the HTML file you like to upload, right-click and then, choose upload.
Overall, this process takes some time to upload. After its completion, you will find that the files have appeared in the right-hand panel.
Congratulations!
Now, your HTML file is uploaded successfully to the website. You can use the website URL path including the file name and check the exact functioning of the website.
Step 6: From the left-hand panel, choose the HTML file you like to upload, right-click and then, choose upload.
Overall, this process takes some time to upload. After its completion, you will find that the files have appeared in the right-hand panel.
Congratulations!
Now, your HTML file is uploaded successfully to the website. You can use the website URL path including the file name and check the exact functioning of the website.
Why Do You Need to Upload an HTML file to WordPress?
Some definite reasons are there that reveals why you need to upload an HTML file to WordPress. Check them out below:-
You Hold Your Favorites
Discuss your WordPress project needs with Expert developers Now!!
-
You Need a Custom Page Layout
When Uploading HTML to WordPress is Necessary?
Before delving directly to know how to upload the HTML file to WordPress, it is essential to know when uploading becomes essential:-
You Require the Custom Page Layout
-
You Hold an Existing HTML File
-
You Need Google Search Console Verification
Precautions Before Uploading HTML Files
As we have already indicated, uploading HTML files can result in some errors on the WordPress website, so we strongly recommend that you should take some precautionary measures:-
Have your Website Backup
-
Create a Staging Environment
Different Ways of Uploading HTML files to WordPress
Here, in this section, we will be showing three ways of converting HTML file to WordPress, check them out below:- Upload an HTML file from the WordPress dashboard
- Upload an HTML file with cPanel
- Upload an HTML file with FTP
Uploading HTML file from WordPress Dashboard
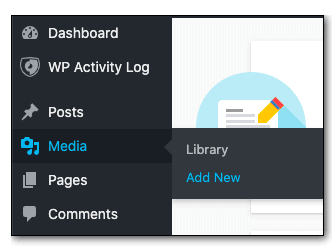
Step 1: Sign Up to the WordPress dashboard and access the Media -> Add New.
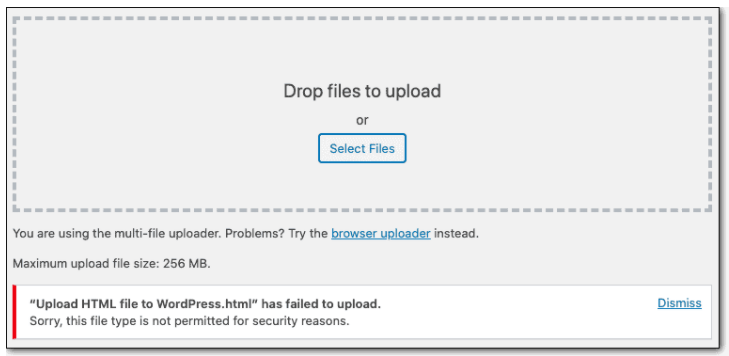
Step 2: Choose the HTML file from your PC and upload it the similar way you upload any image or video. You might face an error like the image shown below while doing this:
Also, if you are not able to upload the file from the media library, then, you can also try the below options:
-
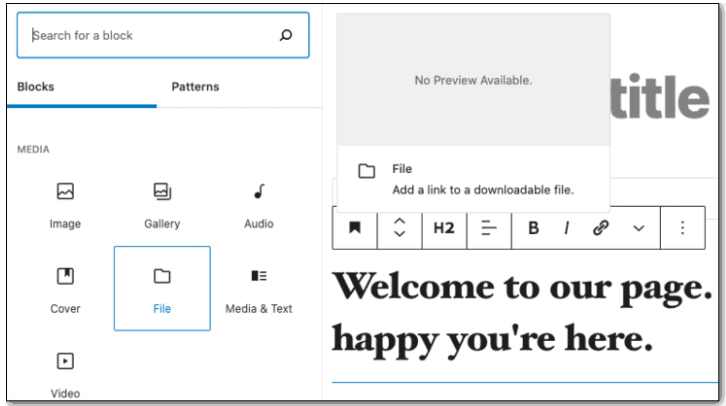
Uploading the HTML file with Gutenberg
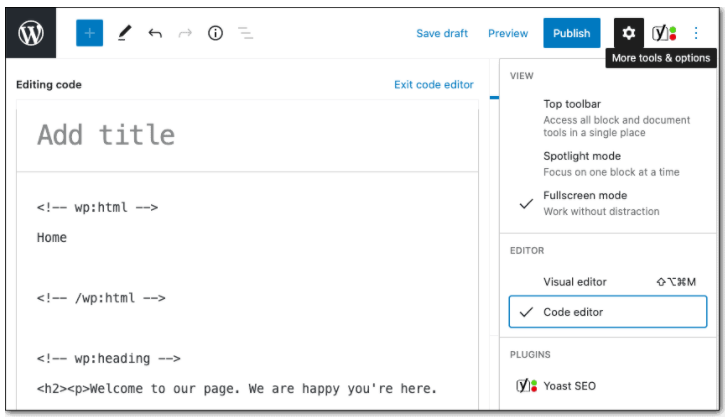
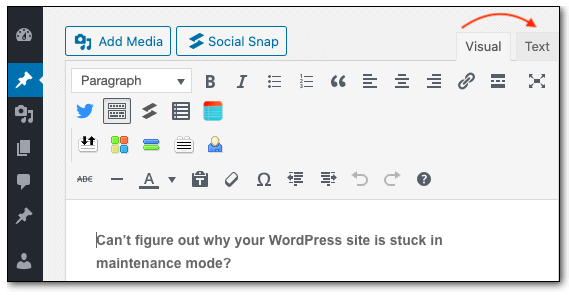
Also, you can copy and paste the HTML code to the page or post. On the right-hand side, select the three dots to have More options and Tools. Choose Code Editor.
It changes the overall page to HTML. What you can do is that- you can copy the HTML code from the HTML file and then, paste it here.
-
Uploading HTML file with Classic Editor
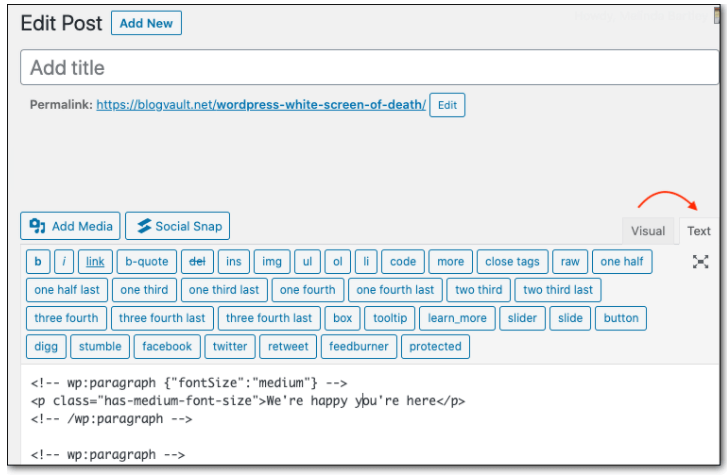
Also, you can choose between Text and Visual Editors on the right-hand side. The text editor that is HTML editor changes the page to HTML and enables you to paste the HTML code. If the uploaded file is not working then, you can also copy and paste it here.
Upload an HTML file with cPanel
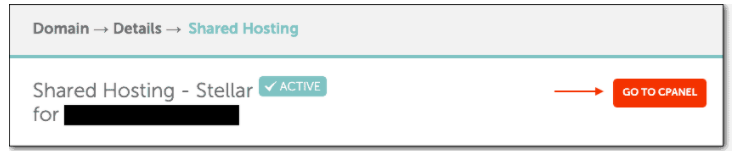
If you do not want to adopt the option to upload via the dashboard, then, you can choose the manual method as well. Find out below how to use cPanel to upload the HTML file. Step 1: Sign up to the web host account and access cPanel.
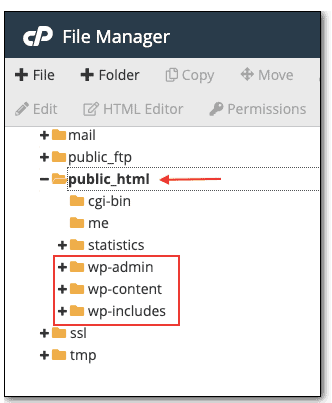
Step 2: Choose File Manager and then, select the folder, public_html. This folder has three more folders, known as, wp-includes, wp-content, wp-admin.
Step 3 Build a folder by choosing the "+Folder" option from the top bar menu and then, name it anything of your choice.
Step 4: Zip files can also get uploaded here.
Note: Before zipping the file, you have to rename the index.html to index.php (you can also choose a different name as well). It is because of the reason that the WordPress website also holds the index.html file. If you upload the new one, then, it will overwrite the existing file and results in some errors on the website.
After renaming the index file and zipping the folder, you can upload it to the folder you built.
Step 5: Now, you can right-click on the folder and select the contents. If you want, then, you can also delete the zip file as well.
This is how you can upload the HTML file to the website successfully.
Build Your Own custom Wordpress website With us
Upload an HTML file with File Transfer Protocol (FTP)
FTP is the third party software that can be installed on your PC easily. It allows you to link to the web server and access the website's folders and files. Step 1: Download and install Filezilla on the PC. Step 2: Open FileZilla and fill in the FTP details such as hostname, username, password, and port number. Then, select the QuickConnect.
Note: In any case, you do not have the FTP details, then, you can contact the web host.
Step 3: FileZilla will build a connection with the webserver. You can find out the left-hand panel termed as Local site that is your Computer and the right-hand panel termed as Remote site that is your website.
Step 4: From the right-hand panel, choose the folder, termed as public_html. It is the place where the website's folders and files stay. If your folder is named with something else, then, you can choose that folder.
Step 5: Make a folder here for the HTML file by choosing and right-clicking on the Create directory and enter it.
Step 6: From the left-hand panel, choose the HTML file you like to upload, right-click and then, choose upload.
Overall, this process takes some time to upload. After its completion, you will find that the files have appeared in the right-hand panel.
Congratulations!
Now, your HTML file is uploaded successfully to the website. You can use the website URL path including the file name and check the exact functioning of the website.