


Migrate Your Wix Site to WordPress: Site Structure Considerations
Thinking of moving from Wix to WordPress??
Indeed, you are on the right track!!
Though, Wix is a practical and appealing option for small businesses. Because of the intuitive and engaging interface, the users find it very easy to create a website.
But, with the passage of time, Wix gave birth to some of the issues - it gives rise to some unexpected business obstacles. Hence, it makes it evident for most to move to other platforms. This is how the migration from Wix to WordPress comes into existence.
No one is unaware of the popularity of WordPress, it has stunned every user with the features and functionalities WordPress holds. Migrating from Wix to WordPress is the best choice. This content management system has powered 35% of all websites on the internet in 2020. It is an increase in 2% in early 2019 and 4% in the prior year.
The migration process requires you to outline everything before initiating, so, here in this article, we will give you an in-depth process of migrating from Wix to WordPress quickly and painlessly. So, let's proceed!!
 From here, you can set up your WordPress permalinks. These permalinks settings will showcase the address of every blog post. In case you want to change the permalink settings, then, you need to navigate to Settings ->Permalinks in the WordPress dashboard. After choosing the required structure, click on the Save changes button from the bottom.
 With the RSS file, you can log-in to the WordPress dashboard and navigate from Tools-> Import. Now, choose the Install Now link in the RSS heading.
 Within some seconds, you will notice a link on the top of the page to Run Importer. Proceed and click on the link.
Now, from the "Choose File" button, select the "feed.xml " file which is saved on the computer. After selecting, Choose the upload file and then import the button.
Within some seconds, you will notice a link on the top of the page to Run Importer. Proceed and click on the link.
Now, from the "Choose File" button, select the "feed.xml " file which is saved on the computer. After selecting, Choose the upload file and then import the button.
 Also, it might take more time when you have more blog posts to import. A confirmation message will be shown when the process completes.
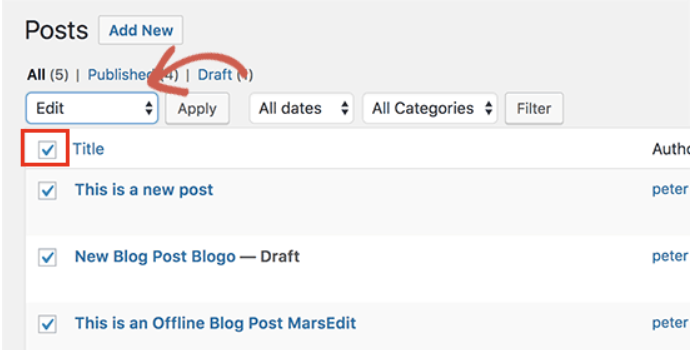
 For checking the blog posts, and to ensure all of them are exported correctly from the Wix, navigate from Posts-> All Posts and choose "View" below every post.
 Now, every content of your blogs is migrated, but, it has an issue- some of the images in the post are now hosted in the Wix. Fortunately, an easy way is there that helps you to fix it and migrate the images to WordPress.
You only have to install and activate the Auto Upload Images plugin. The plugins are similar to Apps in the case of WordPress that enables you to integrate the new features.
When the process of installation and activation completes, re-save the posts that have images.
The plugins are importing the images within it. Though, this process takes a lot of time, so we can give you a quick tip to re-save WordPress posts easily and quickly.
All you need to - navigate to Post -> all post pages and click on the screen options button from the top.
Now, every content of your blogs is migrated, but, it has an issue- some of the images in the post are now hosted in the Wix. Fortunately, an easy way is there that helps you to fix it and migrate the images to WordPress.
You only have to install and activate the Auto Upload Images plugin. The plugins are similar to Apps in the case of WordPress that enables you to integrate the new features.
When the process of installation and activation completes, re-save the posts that have images.
The plugins are importing the images within it. Though, this process takes a lot of time, so we can give you a quick tip to re-save WordPress posts easily and quickly.
All you need to - navigate to Post -> all post pages and click on the screen options button from the top.
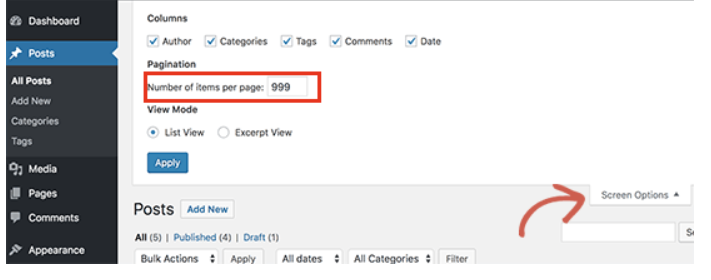 Here, you have to update the number to 999 from the "Number of items per page field" and then, click on the "Apply" button. Now, the WordPress reloads the page and will display 999 posts at one time. Following this, you have to choose every post and then choose the Edit in the bulk action menu.
 Next, choose the "Apply" button and then WordPress will display the smart edit box with the chosen posts. Click the updated button and then WordPress will update every post.
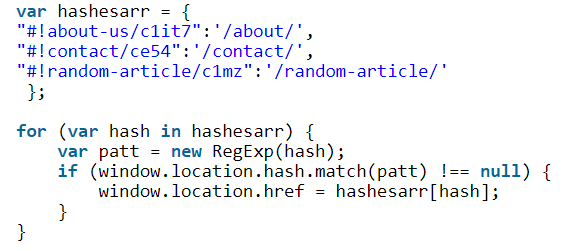 This code has three example URLs in the below format:
 The string in the URL marks the first line of the code. It is the URL that your Wix users are using to move to a new web page. The next line is showing the WordPress slug intended for the same page.
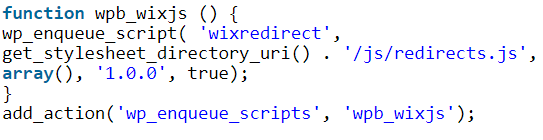
Besides, you need to add the URL in the same format manually. After completing the process, save the file as redirects.js and then upload it to the WordPress theme’s /js/ directory with the FTP client.
If the theme does not encompass the /js/ directory, then make the one. Next, edit the theme’s functions.php file and integrate the code beneath this file.
The string in the URL marks the first line of the code. It is the URL that your Wix users are using to move to a new web page. The next line is showing the WordPress slug intended for the same page.
Besides, you need to add the URL in the same format manually. After completing the process, save the file as redirects.js and then upload it to the WordPress theme’s /js/ directory with the FTP client.
If the theme does not encompass the /js/ directory, then make the one. Next, edit the theme’s functions.php file and integrate the code beneath this file.
Prepare your Website for Conversion
The first thing first- make your new WordPress website ready for the migration. The time or the length of the migration process relies on how large your existing Wix website is, do you need the existing SEO perspectives and the actual familiarity with WordPress. In case, you are non-familiar with all this, then there are several tutorials online- you check that out and comprehend WordPress from A to Z.Get free consultation for your WordPress needs today!
How to Migrate Wix to WordPress?
Step 1: Get New Hosting
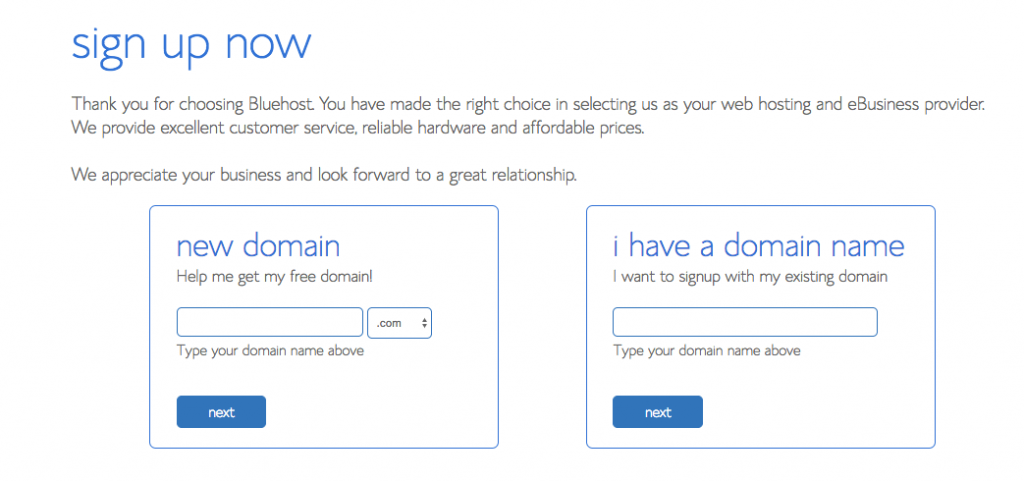
There is a stack of hostings you are using with Wix. Therefore, when you migrate the website from Wix, you require a way of hosting the new website. In addition to hosting, there is a need to purchase a domain name or switch. Hosting aims to give you the website that does not take time to load and does not go down. WordPress has a plethora of hosting providers- managed hosting or Bluehost or SiteGround are some of the best ones for your new WordPress website. All these hosting providers incorporate security, updates, performance and security features. And, if your domain name is already registered with Wix, then, there is no issue. Here, we are considering Bluehost, so, to sign up with this, enter the existing domain in "I have a domain name" option.
Step 2: Setup Your New WordPress Website
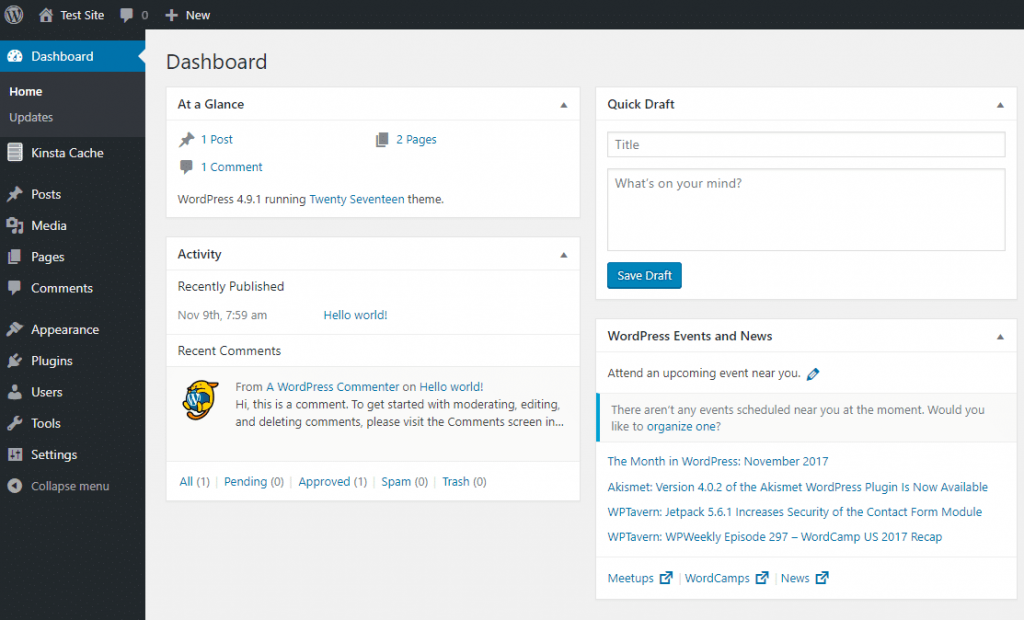
After securing the WordPress host and the domain for your new website. Now, you can start creating your new hope of business growth. As we have signed up Bluehost, then, you should know that it installs the WordPress automatically for you. All you need to login to the WordPress dashboard from the hosting account. After login, you will find a WordPress admin dashboard.
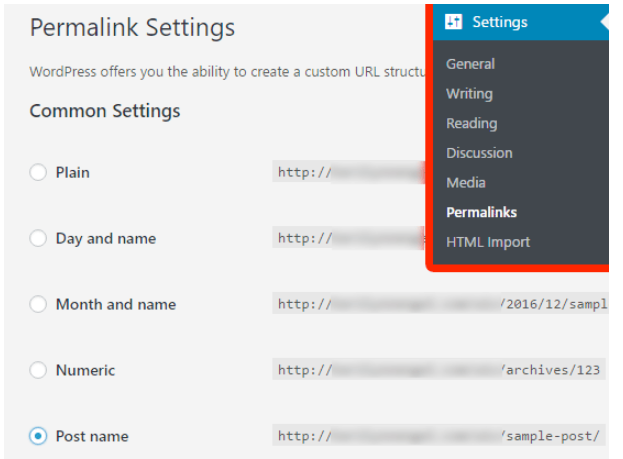
From here, you can set up your WordPress permalinks. These permalinks settings will showcase the address of every blog post. In case you want to change the permalink settings, then, you need to navigate to Settings ->Permalinks in the WordPress dashboard. After choosing the required structure, click on the Save changes button from the bottom.
Step 3: Website Customization
The website can be customized from the plugins and themes. Most of the themes are minimalist and basic, whereas, others are there to add more features to your website. WordPress has several themes in its repository that can be installed from the WordPress dashboard. To get it done, you need to navigate to Appearance ->Themes ->Add New. Note: The paid themes are usually high-quality and offer more customization options. If you want to utilize these option properly, opt for WordPress theme customization agency to get fully customized website with high performance. You can have a look at the below popular paid themes that you can choose for your WordPress website:- Studiopress
- ThemeForest
- WordPress Premium Theme Directory
- Elegant Themes
Hire us to migrate your website Today
Step 4: Migrating the Content from Wix to WordPress
When it is about migrating the content, then you have to be more cautious. It is a complicated and tedious task. Lets' begin with the general:Single Pages In Wix to WordPress
Here, you need to copy the content manually from Wix and paste it to the new WordPress website page. The same will be applied to images even. Now, download them and then save it to the computer. You can use the Media Folders plugin to take them to the appropriate folder. After copying every static page, integrated them to the Menu by navigating from Appearances -> Menu.Step 5: Import the Wix Blogs to WordPress
For porting the Wix blogs to WordPress, there are two ways. You can follow any of them. They are:- The RSS Way
- The Manual Way
RSS Way
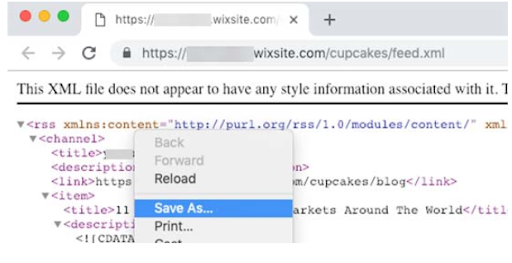
For starting, you have to download the Wix RSS file. For locating the file - you need to add /blog-feed.xml or /feed.xml to the Wix website URL. In case of the non-availability of the custom domain with Wix, you can get the RSS feed at username.wixsite.com/blogname/blog or feed.xmlusername.wixsite.com/blogname/feed.xml. Here, “username” is the Wix username and “blog name” is the blog name. If you hold a custom domain, like, www.yourwixblog.com, then from, www.yourwixblog.com/blog-feed.xml or www.yourwixblog.com/feed.xml, the RSS feed can find out. After moving to the proper URL, you will check the full page code. Proceed and right-click anywhere on the page and choose "Save As" for saving the file on the computer.
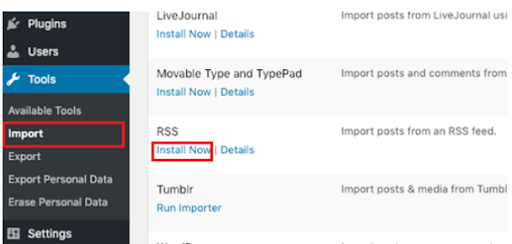
With the RSS file, you can log-in to the WordPress dashboard and navigate from Tools-> Import. Now, choose the Install Now link in the RSS heading.
Within some seconds, you will notice a link on the top of the page to Run Importer. Proceed and click on the link.
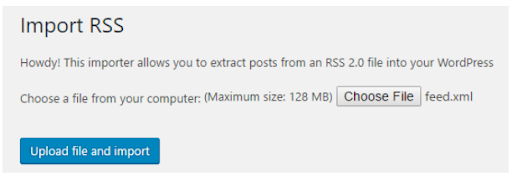
Now, from the "Choose File" button, select the "feed.xml " file which is saved on the computer. After selecting, Choose the upload file and then import the button.
Also, it might take more time when you have more blog posts to import. A confirmation message will be shown when the process completes.
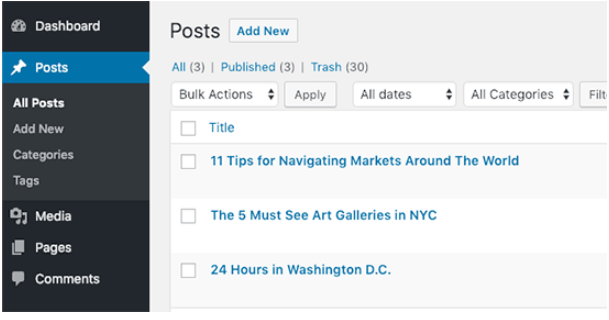
For checking the blog posts, and to ensure all of them are exported correctly from the Wix, navigate from Posts-> All Posts and choose "View" below every post.
Now, every content of your blogs is migrated, but, it has an issue- some of the images in the post are now hosted in the Wix. Fortunately, an easy way is there that helps you to fix it and migrate the images to WordPress.
You only have to install and activate the Auto Upload Images plugin. The plugins are similar to Apps in the case of WordPress that enables you to integrate the new features.
When the process of installation and activation completes, re-save the posts that have images.
The plugins are importing the images within it. Though, this process takes a lot of time, so we can give you a quick tip to re-save WordPress posts easily and quickly.
All you need to - navigate to Post -> all post pages and click on the screen options button from the top.
Here, you have to update the number to 999 from the "Number of items per page field" and then, click on the "Apply" button. Now, the WordPress reloads the page and will display 999 posts at one time. Following this, you have to choose every post and then choose the Edit in the bulk action menu.
Next, choose the "Apply" button and then WordPress will display the smart edit box with the chosen posts. Click the updated button and then WordPress will update every post.
Manual Way
For manually, use Wix to copy the content and make a new post in WordPress and then paste the copied content there. Then, take the images from Wix and upload them all to the Media folder. Navigate to WordPress posts and integrate all in suitable locations. It may sound tough, but it allows you to access everything and re-looked. You can choose what you require and what you don't. In the same fashion, while migrating the posts, you can change the structure and upgrade the content. Otherwise, you will never really set aside time to perform this operation. Here, you can use the Yoast, the SEO plugin. While publishing the posts, the Yoast plugin will give you some suggestions and help you improve the content's readability score. Following this way, after migration, your website ranking will surely get a boost.Step 6: Import the Wix Pages to WordPress
As now, you have migrated the blog posts, now, the Wix pages will get transferred to the WordPress website. Though, Wix does not have some automated way to execute this, so you need to show some efforts to make every page again. Initially, navigate to the Wix page that you need to migrate to the new WordPress website. Mark the content, not the page title and then right-click to copy. Next, log in to the WordPress dashboard and then, move to Pages-> Add new to make the new page. The page title can be added to the top of the webpage. Click right and choose the Paste button to recreate the content. After styling the page, choose the "Publish" button to post the page to WordPress. Note: This method is not applicable to some pages- "contact page" is one of them. So, you are required to install the contact form plugin from the WordPress repository to make the new contact page. All of the content is converted now, so, it will be better to examine the pages and posts carefully to assure that everything is according to the requirements and will work the same way you demand.Hire our web developer to get pixel perfect website
Step 7: Redirect Wix to WordPress
Your WordPress website is created- now, you can show your move to your readers. But, while showing the move, it is also important to make the proper redirection. It will allow all of your existing visitors to arrive on the same webpage from the new website. Moreover, it will also enable the search engines to discover that your old website has moved to some new location. Primarily, open the plain text editor such as Notepad and then paste the below code:
This code has three example URLs in the below format:
Step 8: Remember to Save the Changes
And, it is done. We recommend you to use the URL from the existing Wix website to check if the redirection is right. All these redirects do not redirect the search engines and are not search-friendly. Also, be certain about notifying the visitors or customers about the new address. You can use social media, email newsletter and blog posts to make an announcement.Step 9: Integrate the Important WordPress Plugins
We know that the main aim of the WordPress Plugins is to enable the users to integrate extra features to the website. They are the same as the Wix Apps. Many plugins are there- free and paid. There are several plugins in the WordPress repository that you can use. If you are in need of Wix style drag & drop page builder, then choose the best one from the drag & drop WordPress page builder plugins.Step 10: Tests Every Web Post & Webpage
Now, you incorporate the URLs list as you have established the redirects. Although, we advise you to check every page and post so that your position of Search engines does not hamper. So, it will be better if you will text it all on Google. Check it out how:- Go to Google Search.
- Insert your Page or Post keyword with the new WordPress website name.
- Get your link and click on it.
- Verify if the new WordPress Page or Post opens and appears engaging.
- Repeat this process for each Page or Post.
After Migration
After migrating from Wix to WordPress, you are required to update your new WordPress website further. Particularly when you start using WordPress, then, below are some suggestions with a good starting point.# Website Security
We recommend you to get the secure WordPress host that has more features for website security. Besides, few practices are there to guard your new website. Measures like changing the login URL, having a strong password and using the WAF solution like, Sucuri and Cloudflare matters a lot.# Search Engine Optimization
For higher SEO, you need to keep your WordPress website intact. Nevertheless, similar to the other platforms, there are many things that you need to follow to make your website rank higher.- Get a valued SEO plugin.
- Build a sitemap file and present it to Google and Bing.
- Double-check the robots.txt file.
- Go through and enhance your WordPress site SEO.